Showing posts with label Secure. Show all posts

June 11, 2022

Configure a API Backend Server with custom domain on Amazon Web Services (AWS) EC2 Ubuntu with NGINX and Certbot SSL

Hi all,

Build your own API backend server on AWS free-tier with SSL.

The below steps with reference links will provide detailed information of each step.

  1. AWS account - Free-tier
  2. Create EC2 Ubuntu
  3. Connect to Ubuntu from your local using SSH/Putty
  4. Install NodeJS
    1. Open terminal
    2. curl -fsSL http://deb.nodesource.com/setup_lts.x | sudo -E bash -
    3. sudo apt update
    4. sudo apt install nodejs //installs latest LTS nodejs
  5. Create a sample node server
  6. Install and configure node server process manager
    1. sudo npm install -g pm2@latest
    2. Navigate to nodejs server folder
    3. pm2 start <filename>
    4. pm2 startup systemd
    5. pm2 save
    6. pm2 list // List all the nodejs apps with status
    7. pm2 stop/restart/start app_name/id // Actions of nodejs servers
  7. Install Nginx
  8. Configure your domain DNS records to map to AWS EC2 public/elastic IP address
  9. Secure Nginx with SSL certs

Hope the above information is useful to set up the environment and play with your backend server.

Feel free to send your feedback and comments to psrdotcom@gmail.com


June 10, 2021

Generate Free SSL Certificate using ZeroSSL

 Hi all,


Today I am going to explain the process of generating free SSL certificate using ZeroSSL


Pre-requisite

  1. We should have our own domain
  2. We should be able to add/update the DNS settings like A, CNAME, TXT records

Best free SSL providers

As per my research I found the best free SSL (90 days) certificate providers

  1. ZeroSSL
  2. Let's Encrypt

In this blog, i'll explain ZeroSSL process

ZeroSSL Free SSL Certificate

  1. Navigate to https://zerossl.com/
  2. Signup with your email by clicking on "FreeSSL"
  3. After email verification, login to zerossl site
  4. Click on "New Certificate"
  5. Enter your domain name and click on "Next Step"
  6. Default validity is 90 days for free SSL
  7. In the CSR section we have couple of options
  8. Default is Auto-Generate CSR enabled
  9. Disable Auto-Generate CSR - only your zerossl registered email address with default values
  10. Enable Paste Existing CSR - If you have already created a CSR then you can use this option
  11. Finalize your order


Note

ZeroSSL will generate the certificate using signature algorithm SHA-384

In some cases, if SHA-384 based SSL is not valid then we have to mandatory go for alternate "Let's Encrypt". I will explain Let's Encrypt in my next blog.

For every 90 days, we need to renew our certificate in the above mentioned manner.

Download Certificate

  1. Navigate to Certificates section
  2. Go to Issued tab
  3. Click on "Install"
  4. You can select the Default Format dropdown to select specified server or just leave it default.
  5. Download the certificate zip file which will contain 
    1. ca_bunder.crt - CA Bundle
    2. certificate.crt - Certificate
    3. private.key - Private Key


Hope, you will be able to make use of this free SSL feature and encrypt your domain traffic.

Please let me know your feedback and suggestions in comments or mail to psrdotcom@gmail.com
February 28, 2012

Simple Steganography to hide file(s) under an image in Windows

Hi all,

Do you want to hide your files under an image to secure important data? That is called Steganography.

In Windows with "copy" command, it is possible.

Pre-Requisites:
An image file with any image file extension .jpg, .png etc
A File to hide in any format
An archive file manager like WinRAR, 7-Zip etc.


Procedure:

We will be explaining with sample example and the following files will be used in the explanation.

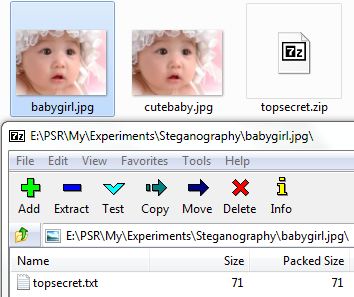
cutebaby.jpg -> Cover Image, which hides the data file
topsecret.txt -> file to be hidden
babygirl.jpg -> stego image, which contains hidden data file
E:\PSR\My\Experiments\Steganography -> Working Folder


  • After arranging the pre-requisites as above shown, archive your data file (file to hide). In this example, it is "topscret.txt"


  • Now you will be getting the archive file named "topscret.zip" in the file explorer
  • Open Command Prompt and Navigate to the corresponding folder. In this example
  • Delete the "topscret.txt" by using the "del" commad
  • Now, run the copy command with the following syntax 
    • Syntax: copy /b +  
    • Example: copy /b cutebaby.jpg + topsecret.txt babygirl.jpg
  • It will create an image file which contains hidden data file in it.
  • To view the stored data file from the image, open the image file from archive viewer.
  • Specify the path to extract
  • Click on "Extract" button
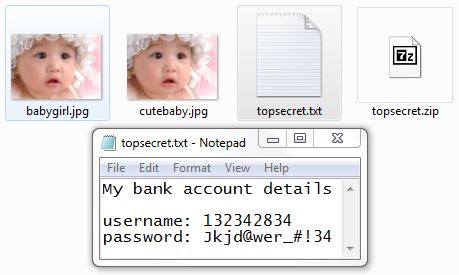
  • View the file list from Windows explorer and/or command prompt
  • Check the data file content
Note:
  • The stego image file size would be more than the data file + cover image file size
  • Any one can view the data file if they know that data file is hidden under the cover image
 
If you have any queries, send mail to psrdotcom@gmail.com

January 20, 2012

Protect Your USB Pen drive by making it Write Protect / Read Only Device in Windows from Viruses

Hi friends,

Today I have come across protecting the USB pen drive from viruses.

I found lot of useful stuff from internet. I just want to share my views on USB Pen drive protection

There are several to protect your pen drive from viruses. I found the following ways are useful.

Make the USB Pen drive Read-only or Writable:
  1. Installing a software which provides options
  2. Running the .reg files to edit the registry automatically
  3. Manually editing registry
1. Installing a software which provides options
Thumbscrew is a software which makes the drive read-only or writable with single click.

Please find the source of the Thumbscrew software from this link
http://www.irongeek.com/i.php?page=security/thumbscrew-software-usb-write-blocker&mode=print

The installation and usage of the Thumbscrew software are described in this blog
http://editecforum.blogspot.com/2008/06/make-your-usb-read-only-while-putting.html

2. Running the .reg files to edit the registry automatically
Download the .reg files from this link
http://www.shaplus.com/exes/guide/EnableOrDisableUSBWrite.zip

When you want to make device read-only then please run the EnableUSBWrite.reg and connect the device
When you want to make device writable then please run the DisableUSBWrite.reg and copy the content

For further more information on these .reg files, please visit their link
http://www.shaplus.com/guide/Computer_Internet/write-protect-usb-flash-drive.htm

Note: You can view the .reg file content by opening the file in notepad or any other text editor

3. Manually editing registry
If you want to do it manually to see how it will work, then you can do that also by following this procedure
http://blog.ashfame.com/2008/04/write-protect-usb-thumb-pen-drive/


Make your USB Pen drive a bit faster
By following this procedure you can make your pen drive to work faster compared to previous
http://www.labofweb.com/how-to-protect-pendrive-from-virus-prevent-the-entry-of-virus-to-your-usb-drive-and-increase-its-speed-of-perfomance-by-formating-it-in-ntfs-file-system-and-making-as-read-only/

Protect your pen drives from viruses
Block all the executable files from your pen drive from running virus
http://www.techtola.com/2008/01/ways-to-prevent-70-virus-malware.html

Featured Post

Java Introdcution

Please send your review and feedback to psrdotcom@gmail.com