Showing posts with label Image. Show all posts

January 27, 2021

Windows Batch File - Embed Image (Base64 Encoded) in HTML Code

 Hi folks,

Today I am going to explain how we can add an image to the HTML code in without copying the images in relative path folder.

Procedure

  • Prefix file contents.
    • <img src="data:image/png;base64,
  •  Batch file contents.
  • Suffix file contents.
    • " alt="PSR" />
  • Download the batch file.
  • Open command prompt in Windows.
  • Navigate to the batch file contained folder.
  • Execute the batch file image file name as parameter.
    • > Image2Base64ImgTag.bat PSRImage.jpeg
  • You should see a file "imageTag.html".
  • Open the file to see image in a browser.
  • Open the file with notepad to see the image converted to base64 with proper HTML Image tag.


Hope this helps you to reduce lot of efforts in maintaining the image files/folders.

Send your feedback and comments to psrdotcom@gmail.com

July 19, 2020

Simple free and open source generating QR code in your web page or blog with an API call

Hi folks,

Do you want to generate QR codes and display in your website or blog or for development.

You can call these API with the relevant data to get the QR code as an image format

    cht -> Chart Type = QR
    chl -> Chart Data = data
    choe -> Chart Encoding = UTF-8
    chs -> Chart Size = width x height
    size = width x heigth
    data = text data which we want to place in QR code

    
    Request Body    
{
    "frame_name": "bottom-frame",
    "qr_code_text": "https://www.qr-code-generator.com/",
    "image_format": "SVG",
    "frame_color": "#02bfff",
    "frame_text_color": "#ffffff",
    "frame_icon_name": "mobile",
    "frame_text": "Scan me",
    "marker_left_template": "version13",
    "marker_right_template": "version13",
    "marker_bottom_template": "version13"
    }

Please send your queries and feedback to psrdotcom@gmail.com

April 14, 2020

Microsoft SQL Server 2019 Express Docker image Example

Hi Folks,

Today I am going to explain the procedure for connecting to a Microsoft SQL Server 2019 Express edition docker image

Pre-requisites

  1. Docker Desktop
  2. Windows OS
  3. Powershell/command prompt

Procedure

Get and run docker image

> docker run -e "ACCEPT_EULA=Y" -e "SA_PASSWORD=<Your_Password>" -e "MSSQL_PID=Express" --name "<Your_SQL_Server_Name>" -p 1433:1433 -d mcr.microsoft.com/mssql/server:2019-latest

Command information

Remove the "MSSQL_PID=Express" to run other version of SQL Server
Replace 2019 with required SQL Server version
Password should be atleast 8 characters with capital, small, numeric, special character combination
Use different port if you already have a local sql server
Name should not contain spaces

Check for docker container

> docker ps

You should able to see the container with your SQL Server name at the end in running status

Connect to SQL Server

docker exec -it "<Your_SQL_Server_Name>" /opt/mssql-tools/bin/sqlcmd -S localhost -U SA -P "<Your_Password>"

You should be able to see "1>" prompt

Command information

Use the SQL Server name or user the container ID

Use database and play around with table(s)

Important
Multiple commands can be entered one after one, but to execute the set of command(s), you need give "GO" command.

Create Database

CREATE DATABASE SampleDB
GO

List all databases

SELECT Name from sys.Databases
GO

Start using the database

USE SampleDB
GO

Create table

CREATE TABLE UserInfo ( Id INT, Name VARCHAR(64))
GO

Insert values

INSERT INTO UserInfo (1, 'ABC')
GO

Retrieve table contents

SELECT * FROM UserInfo
GO

Exit from SQL Server

QUIT

Hope you are able to run the SQL Server Docker image.

Please send your feedback and comments to psrdotcom@gmail.com

March 17, 2020

Connect to public hosted Ubuntu server MySQL Docker Image from local MySQL Workbench

Hi folks,

Today I am going to explain the procedure to test the public cloud hosted MySQL docker in Ubuntu Server to your local MySQL WorkBench.

We configured a Ubuntu Server on public cloud and installed docker.
Ping the public IP address to make sure, it is reachable to your pc/laptop.

Configure System

Install MySQL Docker Image

# docker pull mysql/mysql-server:latest

Check the images

#docker images
You should be able to view the downloaded mysql server image

Start the MySQL Server

# docker run --name=mysql1 -p 33061:3306 -d mysql/mysql-server
-d : Run in daemon mode
-p host_port:container_port
--name: container name
The mapped public ubuntu server port is 33061, which is mapped to the mysql server port 3306.

Check the containers

# docker ps
You should be able to view your mysql docker containers with container id and ports information

Get the MySQL root user password

MySQL generates a one-time password for docker container and writes to the log.

  • To view the log, execute the following command

# docker logs mysql1

  • To get the generate one-time password, filter the log with keyworkd "GENERATED"

# docker logs mysql1 2>&1 | grep GENERATED

  • You should be able to get the line like below

GENERATED ROOT PASSWORD: Axegh3kAJyDLaRuBemecis&EShOs

  • Copy the one-time password. In the next step, we will use this to login.

Reset MySQL root user password


  • Connect to MySQL server

# docker exec -it mysql1 -uroot -p

  • Paste the generated root password
  • Change the password

mysql> ALTER USER 'root'@'localhost' IDENTIFIED BY 'yourpwd';
mysql> FLUSH PRIVILEGES;
  • Though you have the root user credentials, you won't be able to connect.
Root cause: root user belongs to localhost, not for the public host usage
Solution: create another user with all privileges
mysql> CREATE USER 'username'@'%' IDENTIFIED BY 'youpwd';
mysql> GRANT ALL PRIVILEGES on *.* TO USER 'username'@'%' WITH GRANT OPTION;
mysql> FLUSH PRIVILEGES;

  • Exit the mysql

mysql> exit;

  • Restart the docker

# docker restart mysql1

Connect from MySQL Workbench


  1. Open MySQL Workbench
  2. Click on add new connection icon
  3. Enter the "Connection name"
  4. Enter host name "public IP address" or "URL"
  5. Enter username as "dev" (Above created user)
  6. Click on Password "Store in vault" button and enter the "dev" user password
  7. Click on "Test Connection" button
  8. You should be able to view the "Successfully made the SQL Connection" pop-up


Hope this tutorial helps you to get connected with your public hosted mysql docker instance to your local mysql workbench.

Please send your feedback and comments to psrdotcom@gmail.com

March 06, 2020

View docker image file content with folder structure

Hi folks,

I have come across a scenario where I need to see the image contents.

Yes, I want to view the image content with hierarchy.

Then I found this dive, which has done it beautifully.

Install on Ubuntu PC


  1. # wget https://github.com/wagoodman/dive/releases/download/v0.9.2/dive_0.9.2_linux_amd64.deb
  2. # sudo apt install ./dive_0.9.2_linux_amd64.deb

Usage


  • Get the docker images list
    • # docker image list
  • Choose the image which you want to explore by copying the "Repository" name
  • Run the command
    • # dive
  • It takes some time to analyse and display the image contents in hierarchical manner.
  • Of the left side, it will have the image layers
  • Select the appropriate image layer with up/down arrow keys
  • By pressing the "Tab" you will be able to switch to right side view where your files are available
  • Use space to expand/collapse the folder
  • Dive will display each folder size
  • See the sample docker image contents with dive below


  • To quit/exit from the dive, use Ctrl+C


Hope this is helpful

Please send your feedback and comments to psrdotcom@gmail.com

October 24, 2019

Markdown file convert/export to html, png, jpeg, pdf with images

Hi folks,

Today I will share about, how we can include the images in markdown file and export to pdf, html, png and jpeg formats.

You can do this with 2 Visual Studio Code extensions

Pre-requisites

Visual Studio Code with following MarkDown Extensions
  1. To place images
  2. To convert the markdown to pdf, html, png and jpeg formats
Install the above 2 Visual Studio Code extensions.

Insert an image

Create images folder and keep all your images (Optional, but easy to maintain)
Syntax: ![](images/imagename.extension)
Usages: ![](images/abc.png)

By now, your image is part of your file.

Preview your file

Open Command Palette (View -> Command Palette OR Type F1 OR Ctrl+Shift+p)
Type "Markdown: Open Preview" OR Ctrl+Shift+v keyboard shotcut

Export Markdown

Open Command Palette (View -> Command Palette OR Type F1 OR Ctrl+Shift+p)
Type export and select below
  • markdown-pdf: Export (pdf)
  • markdown-pdf: Export (html)
  • markdown-pdf: Export (png)
  • markdown-pdf: Export (jpeg)
  • markdown-pdf: Export (all: pdf, html, png, jpeg)

Change Markdown conversion settings

  1. Select File > Preferences > UserSettings or Workspace Settings
  2. Find markdown-pdf settings in the Default Settings
  3. Copy markdown-pdf.* settings
  4. Paste to the settings.json, and change the value
Hope this blog is useful to insert images in your markdown file and export to supported formats.

Please send your valuable feedback and comments to psrdotcom@gmail.com

August 15, 2014

Android L Preview on Nexus 7

Hi all,

Today I’ve finally loaded the Android L Developer Preview on my Nexus 7 Wi-Fi 32GB


Its so simple to load the Android L. Here is the procedure


Warning

All the device data will be erased. Please take backup of all your data before doing this upgrade.

Not all the applications will work since it’s just a developer preview OS version


Pre-requisites

  • Android SDK with latest update
  • Android L Preview OS image
  • Make sure that, your device has more than 60 to 70 percent of battery
  • Enable USB Debugging
  • Connect the device to computer with USB cable. Make sure that, it has detected by computer


If you don’t’ have the pre-requisites, please follow the below procedure


Android SDK Installation & Update

  1. Download the Android SDK from this link
  2. https://developer.android.com/sdk/index.html
  3. Open SDK Manager.exe
  4. Install Tools, Android L Preview, Extras
  5. Update latest version if available


Android L Preview OS Image Download

  1. Download the corresponding Android L OS image for your device from this below link


Installation Process

  1. Extract the downloaded image to a folder
  2. From Android SDK folder, navigate to “platform-tools” folder, copy adb.exe, AdbWinApi.dll, AdbWinUsbApi.dll and fastboot.exe
  3. Paste in the Android L Preview extracted folder
  4. Finally the extracted folder should look like this
    • image
  5. The highlighted files has been copied from SDK->platform-tools folder
  6. Open the command prompt and navigate to OS extracted folder
    • Tip
      • Open the folder in explorer window. Hold “Shift” and right click on mouse
      • Select “Open command Window here” option
  7. Connect the device to computer
  8. Put device into “fastboot” mode by rebooting
    • cmd> adb reboot fastboot
  9. Device gets rebooted to fastboot
  10. If device is locked, then please unlock it
    • cmd> fastboot oem unlock
  11. Now, run the “flush-all” script
    • cmd> flush-all
  12. It takes some time to install the image
  13. After completing the installation process, it asks you to press “enter/return” button to exit
  14. Press enter/return button for confirmation
  15. Device gets restarted, Android L Preview will be displayed on the device
  16. To lock the device, execute following commands
    • cmd> adb reboot fastboot
    • cmd> fastboot oem lock
  17. Like a new device, enter all the details like your Gmail account, Wi-Fi connection etc.
  18. Enjoy the features of Android L Developer Preview OS


Please send your feedback and queries to psrdotcom@gmail.com
Blogger Labels: Android,Preview,Nexus,Developer,Here,procedure,device,data,version,requisites,Make,Enable,Connect,computer,Installation,Update,Download,index,Open,Manager,Install,Tools,Extras,Image,developers,Extract,folder,From,platform,AdbWinApi,AdbWinUsbApi,Paste,explorer,Hold,Shift,Select,option,mode,script,confirmation,account,connection,Enjoy,feedback,fastboot,Gmail

June 25, 2012

Create Hyperlink to the part of the image in HTML using AREA tag

Hi everyone,

Its been a long time that I have been posted a new one. This time I would like share with you the information to create or make some part of the image as hyperlink.

Source:
<img src="image.jpg" usemap="#areal" />
<map name="areal">
<area shape="rect" coords="0,0,50,50" href="http://www.pillisureshraju.info/" target="_blank"></area>
</map>

Important values to observe:
image.jpg -- Image name
areal -- map area name
rect -- Shape type
0,0,50,50 -- x1,y1,x2,y2 coordinates of the shape
href -- hyperlink reference

Now, the hyperlink is been created for your image with the specified coordinates.

Please send your comments and feedback to psrdotcom@gmail.com

February 28, 2012

Simple Steganography to hide file(s) under an image in Windows

Hi all,

Do you want to hide your files under an image to secure important data? That is called Steganography.

In Windows with "copy" command, it is possible.

Pre-Requisites:
An image file with any image file extension .jpg, .png etc
A File to hide in any format
An archive file manager like WinRAR, 7-Zip etc.


Procedure:

We will be explaining with sample example and the following files will be used in the explanation.

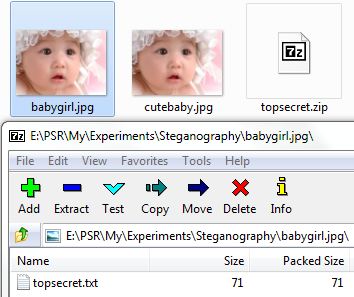
cutebaby.jpg -> Cover Image, which hides the data file
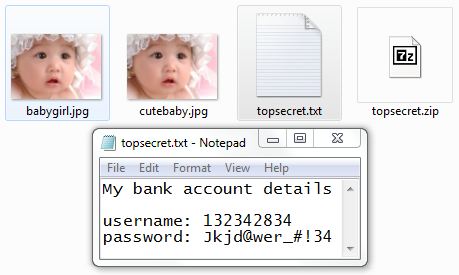
topsecret.txt -> file to be hidden
babygirl.jpg -> stego image, which contains hidden data file
E:\PSR\My\Experiments\Steganography -> Working Folder


  • After arranging the pre-requisites as above shown, archive your data file (file to hide). In this example, it is "topscret.txt"


  • Now you will be getting the archive file named "topscret.zip" in the file explorer
  • Open Command Prompt and Navigate to the corresponding folder. In this example
  • Delete the "topscret.txt" by using the "del" commad
  • Now, run the copy command with the following syntax 
    • Syntax: copy /b +  
    • Example: copy /b cutebaby.jpg + topsecret.txt babygirl.jpg
  • It will create an image file which contains hidden data file in it.
  • To view the stored data file from the image, open the image file from archive viewer.
  • Specify the path to extract
  • Click on "Extract" button
  • View the file list from Windows explorer and/or command prompt
  • Check the data file content
Note:
  • The stego image file size would be more than the data file + cover image file size
  • Any one can view the data file if they know that data file is hidden under the cover image
 
If you have any queries, send mail to psrdotcom@gmail.com

December 24, 2011

Customize Command Prompt in Windows 7 with your own Icon, Starting Directory and more settings ...

Hi all,

Are you getting bored with the same command prompt with black colored background and other settings?

You can customize your own command prompt and you can start from the preferred location (Directory) path, choose your own icon and lot more.

Go ahead by following the below steps ..


Creating the shortcut icon on Destop
  1. Right click on the desktop, select "New" -> "shortcut"
  2. Browse for the command prompt executable file "cmd.exe"
  3. If you have installed your Operating System in C drive then the path might be similar to this
  4. C:\Windows\System32\cmd.exe
  5. Click on "Next"
  6. Type the name for this shortcut, something like "MyCmdPrompt"
  7. Click on "Finish"
  8. Now you can see your command prompt named of your own choice
  9. Now, you can change some properties of your command prompt

Changing the properties of the custom command prompt

  • Right click on the newly created shortcut from the Desktop
  • Select "Shortcut" tab and change the following settings
  1. Change the starting directory: Specify your own choice of directory path in the "Start in" box.
  2. Default Start in path: C:\Windows\System32
  3. Change the icon of your own choice: Click on "Change Icon" and Click on "Browse" button and Select the "C:\Windows\System32\imageres.dll" to list all the windows installed icons.
  4. Select an icon of your own choice and Click on "Ok"
  5. Run as Administrator by default: Click "Advanced" button, Select "Run as administrator" and Click "Ok"
  • Select "Options" tab and change the following settings
    1. Check "Quick Edit mode" to copy and paste easily
  • Select "Font" tab and change the following settings
    1. select your desired "Font" and "Size" settings
  • Select "Layout" tab and change the following settings
  1. select your desired "Window Size"
  2. Note: To see a bigger screen, increase the "Width and Height" attributes of the "Window Size"
  3. You can preview, your settings in the left side preview
  • Select "Colors" tab, You might be bored by seeing the same black and white combination.
  1. Choose your desired colors for Background, Foreground colors for both the "Screen" and "Pop-Up screen"
  • Click on "Apply" and then "Ok" to see your own command prompt.

Hope this post is useful to you customize your own Command Prompt in Windows 7.

For further queries, mail to psrdotcom@gmail.com

December 19, 2011

Converting Power Point Presentation (PPT) to Images and Conversion of Images to PPT

Hi all,
Today I was searching for converting the slideshow to images and doing some batch processing to the images like crop, resize, filename change and again making ppt with the modified images.

I followed the below procedure to convert my slides in ppt to images, cropping the images and finally making slideshow with edited images.
  • Converting slides to images
    1. (MS Office 2007) Office Button (Top-Left) -> Save As ->  Other Formats
    2. Choose the corresponding destination folder
    3. Choose "Save as type" as "JPEG File Interchange Format (*.jpg)"
    4. One pop-up comes with the following options
      • Every Slide: This option saves every slide to an individual image
      • Current Slide: This option saves only the current slide to an image
    5. Choose relevant option to you
  • Batch Processing the images
    1. I have seen one video from youtube and I was impressed with the Irfan View working with batch processing of images
    2. Please see the below video and do the batch processing of images
  • Uploading images to PPT
    1. (MS Office 2007) Click on "Insert" tab and select "Photo Album" -> "New Photo Album"
    2. Select the image(s), which you would like to add in the presentation.
This kind of approach makes our lives easy.


If you have any queries, please mail to psrdotcom@gmail.com

December 19, 2010

Insert and Display image BLOB in JSP page

Hi everyone,

Today we just tried to insert jpeg file and displaying that file in one html page

Source Code:
file name: img_uploadanddisplay.jsp
<%@ page import="java.sql.*"%>
<%@ page import="java.io.*, java.util.*, java.lang.*"%>

<% ResultSet rs=null;
Connection con=null;
Statement stmt=null;
PreparedStatement psmt,psmt1;
Blob blobfile = null;
byte [] imgdata = null;
int status = 0;
boolean del_status = false;
OutputStream os = null;
try
{
String req_id=request.getParameter("id");
System.out.println("Entered"+req_id); Class.forName("sun.jdbc.odbc.JdbcOdbcDriver"); con=DriverManager.getConnection("Jdbc:Odbc:BTSJAVA","System","vijay"); stmt=con.createStatement();
psmt = con.prepareStatement("insert into img_temp values(?,?)");
int id_val = 1;
File img=new File("D:/photos/passport/PP.jpg");
FileInputStream fis= new FileInputStream(img);
psmt.setInt(2,id_val);
psmt.setBinaryStream(1,(InputStream)fis,(int)(img.length()));
status = psmt.executeUpdate();
//System.out.println("Trying to insert data");
if(status>0)
System.out.println("Success");
else
System.out.println("Unsuccess");

stmt.close();

stmt = con.createStatement();
rs = stmt.executeQuery("select imgfn from img_temp where id = 1"); //+Integer.parseInt(req_id));

response.setContentType("image/jpeg");
os = response.getOutputStream();

while(rs.next())
{
System.out.println("Getting Data");

os.write(rs.getBytes("imgfn"));

System.out.println("Got Data");
}

os.flush();
os.close();
}
catch(Exception e)
{
out.println(e);
e.printStackTrace();
}
%>

Create a html file with the following content

image tag src="img_uploadanddisplay.jsp?id=1"


Please send your feedback and queries to me.

November 03, 2008

My first Matlab Program, Encode and Decode image using Huffman Coding

For the academic purpose i had written a small program in Matlab.

I have tried encoding and decoding the image by using Huffman coding.

Huffman code generally used for data encoding but i tried Huffman coding on small image.

Preconditions:
  1. You need to create a small image, in my code i am using PSR.jpg
  2. It will work well only with small images

Matlab Code:

%Huffman Coding on image by Suresh Raju Pilli

%clearing all variableas and screen
clear all;
close all;
clc;

%Reading image
a=imread('psr.JPG');
figure,imshow(a)

%converting an image to grayscale
I=rgb2gray(a);

%size of the image
[m,n]=size(I);
Totalcount=m*n;

%variables using to find the probability
cnt=1;
sigma=0;

%computing the cumulative probability.
for i=0:255
k=I==i;
count(cnt)=sum(k(:))

%pro array is having the probabilities
pro(cnt)=count(cnt)/Totalcount;
sigma=sigma+pro(cnt);
cumpro(cnt)=sigma;
cnt=cnt+1;
end;


%Symbols for an image
symbols = [0:255];

%Huffman code Dictionary
dict = huffmandict(symbols,pro);

%function which converts array to vector
vec_size = 1;
for p = 1:m
for q = 1:n
newvec(vec_size) = I(p,q);
vec_size = vec_size+1;
end
end

%Huffman Encodig
hcode = huffmanenco(newvec,dict);

%Huffman Decoding
dhsig1 = huffmandeco(hcode,dict);

%convertign dhsig1 double to dhsig uint8
dhsig = uint8(dhsig1);

%vector to array conversion
dec_row=sqrt(length(dhsig));
dec_col=dec_row;

%variables using to convert vector 2 array
arr_row = 1;
arr_col = 1;
vec_si = 1;

for x = 1:m
for y = 1:n
back(x,y)=dhsig(vec_si);
arr_col = arr_col+1;
vec_si = vec_si + 1;
end
arr_row = arr_row+1;
end


%converting image from grayscale to rgb
[deco, map] = gray2ind(back,256);
RGB = ind2rgb(deco,map);
imwrite(RGB,'decoded.JPG');

%end of the huffman coding

Postcondition:
  1. Check the original image and decoded image
  2. Analyze the compression ratio.
You can easily understand the code. Its not at all difficult.

Please send your feedback and comments to psrdotcom@gmail.com

Featured Post

Java Introdcution

Please send your review and feedback to psrdotcom@gmail.com