Showing posts with label Server. Show all posts

January 30, 2026

Making a Local Dev Server accessible via Public Domain using Cloudflare Tunnel

Hi all,

Today, we are going to discuss how you can publicly access the local running server with a domain and Cloudflare tunnel.

Pre-requisites

  1. Domain
  2. DNS on Cloudflare
  3. Cloudflare One account access
  4. Local server

Set up the environment

Application

Make sure your application runs locally on a port like 8000,9000 etc.

Cloudflare Tunnel

  1. Log in to your Cloudflare One account.
  2. Go to "Zero Trust".
  3. Expand Networks and select Connectors.
  4. Click on “Create a tunnel”.
  5. Select “Cloudflared”.
  6. Give a name to your tunnel.
  7. Click on “Save”.
  8. In the "Choose your environment" section, select the environment where the server is running.
  9. Follow the instructions to install and run a connector.
  10. Here, you need to move to your server machine.
  11. Open the terminal and perform the instructions to install the "cloudflared" tool.
  12. Run using the token (part of the command).
  13. Once the installation is completed. Click on Save.

Add IP/CIDR

  1. Edit the tunnel to add the IP/CIDR.
  2. Choose based on your local DHCP.

Published application routes

  1. Click on “Add a published application route”.
  2. Give an optional subdomain.
  3. Select the domain from the dropdown.
    1. You need to have your domain managed by Cloudflare (DNS).
  4. An optional path to make sure you have a frontend and a backend that work together.
  5. Under service, select Type as HTTP, and your local machine server port.
  6. Select the URL of the server application, including the localport.
    1. localhost:9000
  7. Click on “Save”.
Note: If you have a frontend and a backend, then you need to add one more application route.

In my scenario, the frontend path is * with localhost:9001, and the backend path is api/* with localhost:8000.

Run the tunnel

  1. Make sure your local web server is running
  2. Log in to cloudflared
    • cloudflared tunnel login
    • Authorize the tunnel on the web browser post login
  3. List the tunnels
    • cloudflared tunnel list
  4. Get the tunnel token from the tunnel you created in Cloudflare connectors
  5. Run the command on the local terminal
    • cloudflared tunnel run --token eyJhIjoiM2...
  6. Now, you should be able to browse your configured subdomain with your local web server content. 

Troubleshooted issue

If the frontend with path "/*" is above the backend route, then your backend APIs will never be reached.

So, "move up" the backend with "/api/*" path above the frontend to serve the requests.

Feel free to reach out to me if you have any doubts and clarifications needed at my email psrdotcom@gmail.com


June 11, 2022

Configure a API Backend Server with custom domain on Amazon Web Services (AWS) EC2 Ubuntu with NGINX and Certbot SSL

Hi all,

Build your own API backend server on AWS free-tier with SSL.

The below steps with reference links will provide detailed information of each step.

  1. AWS account - Free-tier
  2. Create EC2 Ubuntu
  3. Connect to Ubuntu from your local using SSH/Putty
  4. Install NodeJS
    1. Open terminal
    2. curl -fsSL http://deb.nodesource.com/setup_lts.x | sudo -E bash -
    3. sudo apt update
    4. sudo apt install nodejs //installs latest LTS nodejs
  5. Create a sample node server
  6. Install and configure node server process manager
    1. sudo npm install -g pm2@latest
    2. Navigate to nodejs server folder
    3. pm2 start <filename>
    4. pm2 startup systemd
    5. pm2 save
    6. pm2 list // List all the nodejs apps with status
    7. pm2 stop/restart/start app_name/id // Actions of nodejs servers
  7. Install Nginx
  8. Configure your domain DNS records to map to AWS EC2 public/elastic IP address
  9. Secure Nginx with SSL certs

Hope the above information is useful to set up the environment and play with your backend server.

Feel free to send your feedback and comments to psrdotcom@gmail.com


December 14, 2021

Fixing the Log4j2 vulnerability in spring boot application

 Hi all,

Software Industry was in a shock with the log4j2 zero day exploit.

Exploited area

The Apache Log4j2 version ( >=2.0 to <=2.14.1 ) is exploitable due to an attacker controlled LDAP and  JNDI endpoints.

Appendix

LDAP (Light Weight Directory Protocol) is an industry standard protocol to access directory services.

JNDI (Java Naming and Directory Interface) is a Java API for a directory service that allows Java software clients to discover and look up data and resources via a name.

Find more information about the vulnerability from NVD website link.

https://nvd.nist.gov/vuln/detail/CVE-2021-44228

NVD (National Vulnerability Database) is maintained by National Institute of Standards and Technology (NIST),  An official part of United States of America (USA) government's Department of Commerce.

Fix the vulnerability

  • Even in the latest spring boot package uses the vulnerable 2.14.1 log4j2 version.
  • So, we need to explicitly add the specific version in the properties as below
  • In pom.xml file, creating <properties> tag if not exists and add the attribute log4j2.version with version 2.16.0 (latest)

<properties>

    <log4j2.version>2.16.0</log4j2.version>

</properties>

  • To check the version applied to the project, run the following command
mvn dependency:tree | grep "log4j"
  • The result should look like below
[INFO] |  |  |  +- org.apache.logging.log4j:log4j-to-slf4j:jar:2.16.0:compile
[INFO] |  |  |  |  \- org.apache.logging.log4j:log4j-api:jar:2.16.0:compile

  • The similar type of vulnerability fixes available for other project builds.


Hope you will find the above information useful and fix the issue immediately to keep the servers safe from attacks.

Send your valuable feedback and comments to psrdotcom@gmail.com


November 10, 2020

Run or deploy Go (Golang) project code in IIS as web server

 Hi folks,

Today we are going to see, how we can run or deploy the Go (Golang) project in IIS.

Development

  1. Create your Golang project with web APIs
  2. Build the Go project
  3. Go build
  4. Result will be an .exe file
  5. Create a web.config file
  6. Update the following content

<?xml version="1.0" encoding="utf-8"?>

<configuration>

    <system.webServer>

        <handlers>

            <add name="aspNetCore" path="*" verb="*" modules="AspNetCoreModule" resourceType="Unspecified" />

        </handlers>

        <aspNetCore processPath=".\<<GoProject>>.exe" />

    </system.webServer>

</configuration>

Deployment 

  1. Place the <<GoProject.exe>> and web.config in IIS server accessible folder.
  2. Open IIS
  3. Create a new website
  4. Enter the web app details with port different from the project internal port
  5. Create or choose pool with .NET CLR version as "No managed code"
  6. The configured website looks like below
  7. After starting the website, user should be able to access the APIs
Hope, this information helps you to deploy the GOlang project in IIS.

 Request you send your feedback and comments to psrdotcom@gmail.com


August 24, 2020

Microsoft Azure DevOps Server move or copy Project Source Code from one organization to another organization

Hi folks,

Today I will explain the process of moving the projects from one organization to another in Azure DevOps Server which includes the source repository code, history of commits, tags.


Pre-requisites

  • Git command line tool
  • ssh-keygen tool
  • Azure DevOps Project access


Environment Setup

  1. Create ssh key on your local PC
  2. Same user account on both the organization with required permissions (Admin)
  3. On Azure DevOps, to go user profile
  4. Add the generated SSH pub key of PC to Azure DevOps


Procedure in terminal/command prompt

1. git clone <old org project repo ssh url>

2. cd <project>

3. git branch -a

    a. git checkout <all branches one by one>

4. git fetch --tags

5. git remote rm origin

6. git remote add orgin <new org project repo ssh url>

7. git push origin --all

8. git push --tags


Hope you are able to move/copy the project source code which includes the history of commits and tags.

Please send your comments and feedback to psrdotcom@gmail.com


June 10, 2020

Microsoft Azure SQL Server Read Only User Creation Deletion

Hi folks,

Today I will explain, how you can easily manage the readonly (view) users in Azure Microsoft SQL Server

Procedure

In Azure SQL Server

CREATE LOGIN [testuser] WITH PASSWORD = 'random_p@$$w0rd';

For master and each DB

Note: You must create the user in master db before creating in other databases
CREATE USER [testuser] FOR LOGIN [testuser]   
    WITH DEFAULT_SCHEMA = [dbo];  
GO

Grant Connect permission

GRANT CONNECT TO [testuser]
GO

Give datareader role to read (view) only

ALTER ROLE db_datareader ADD MEMBER [testuser]
GO

Drop user in DB

DROP USER [testuser]
GO

Drop user in Azure SQL

DROP LOGIN [testuser];
GO

Please send your comments and feedback to psrdotcom@gmail.com

April 14, 2020

Microsoft SQL Server 2019 Express Docker image Example

Hi Folks,

Today I am going to explain the procedure for connecting to a Microsoft SQL Server 2019 Express edition docker image

Pre-requisites

  1. Docker Desktop
  2. Windows OS
  3. Powershell/command prompt

Procedure

Get and run docker image

> docker run -e "ACCEPT_EULA=Y" -e "SA_PASSWORD=<Your_Password>" -e "MSSQL_PID=Express" --name "<Your_SQL_Server_Name>" -p 1433:1433 -d mcr.microsoft.com/mssql/server:2019-latest

Command information

Remove the "MSSQL_PID=Express" to run other version of SQL Server
Replace 2019 with required SQL Server version
Password should be atleast 8 characters with capital, small, numeric, special character combination
Use different port if you already have a local sql server
Name should not contain spaces

Check for docker container

> docker ps

You should able to see the container with your SQL Server name at the end in running status

Connect to SQL Server

docker exec -it "<Your_SQL_Server_Name>" /opt/mssql-tools/bin/sqlcmd -S localhost -U SA -P "<Your_Password>"

You should be able to see "1>" prompt

Command information

Use the SQL Server name or user the container ID

Use database and play around with table(s)

Important
Multiple commands can be entered one after one, but to execute the set of command(s), you need give "GO" command.

Create Database

CREATE DATABASE SampleDB
GO

List all databases

SELECT Name from sys.Databases
GO

Start using the database

USE SampleDB
GO

Create table

CREATE TABLE UserInfo ( Id INT, Name VARCHAR(64))
GO

Insert values

INSERT INTO UserInfo (1, 'ABC')
GO

Retrieve table contents

SELECT * FROM UserInfo
GO

Exit from SQL Server

QUIT

Hope you are able to run the SQL Server Docker image.

Please send your feedback and comments to psrdotcom@gmail.com

March 17, 2020

Connect to public hosted Ubuntu server MySQL Docker Image from local MySQL Workbench

Hi folks,

Today I am going to explain the procedure to test the public cloud hosted MySQL docker in Ubuntu Server to your local MySQL WorkBench.

We configured a Ubuntu Server on public cloud and installed docker.
Ping the public IP address to make sure, it is reachable to your pc/laptop.

Configure System

Install MySQL Docker Image

# docker pull mysql/mysql-server:latest

Check the images

#docker images
You should be able to view the downloaded mysql server image

Start the MySQL Server

# docker run --name=mysql1 -p 33061:3306 -d mysql/mysql-server
-d : Run in daemon mode
-p host_port:container_port
--name: container name
The mapped public ubuntu server port is 33061, which is mapped to the mysql server port 3306.

Check the containers

# docker ps
You should be able to view your mysql docker containers with container id and ports information

Get the MySQL root user password

MySQL generates a one-time password for docker container and writes to the log.

  • To view the log, execute the following command

# docker logs mysql1

  • To get the generate one-time password, filter the log with keyworkd "GENERATED"

# docker logs mysql1 2>&1 | grep GENERATED

  • You should be able to get the line like below

GENERATED ROOT PASSWORD: Axegh3kAJyDLaRuBemecis&EShOs

  • Copy the one-time password. In the next step, we will use this to login.

Reset MySQL root user password


  • Connect to MySQL server

# docker exec -it mysql1 -uroot -p

  • Paste the generated root password
  • Change the password

mysql> ALTER USER 'root'@'localhost' IDENTIFIED BY 'yourpwd';
mysql> FLUSH PRIVILEGES;
  • Though you have the root user credentials, you won't be able to connect.
Root cause: root user belongs to localhost, not for the public host usage
Solution: create another user with all privileges
mysql> CREATE USER 'username'@'%' IDENTIFIED BY 'youpwd';
mysql> GRANT ALL PRIVILEGES on *.* TO USER 'username'@'%' WITH GRANT OPTION;
mysql> FLUSH PRIVILEGES;

  • Exit the mysql

mysql> exit;

  • Restart the docker

# docker restart mysql1

Connect from MySQL Workbench


  1. Open MySQL Workbench
  2. Click on add new connection icon
  3. Enter the "Connection name"
  4. Enter host name "public IP address" or "URL"
  5. Enter username as "dev" (Above created user)
  6. Click on Password "Store in vault" button and enter the "dev" user password
  7. Click on "Test Connection" button
  8. You should be able to view the "Successfully made the SQL Connection" pop-up


Hope this tutorial helps you to get connected with your public hosted mysql docker instance to your local mysql workbench.

Please send your feedback and comments to psrdotcom@gmail.com

March 03, 2020

Run local file server with NPM http-server

Hi folks,

Today i'll explian the process of making your folder as a standalone file server.

Objective

Make my folder contents browse over http

Procedure


  • Install Node
  • Install http-server module in node globally
    • npm install -g http-server
  • Open terminal/command-prompt
  • Navigate to your folder
  • Run the following command to start the server
    • http-server .
  • or simply run
    • hs .
  • Run from anywhere with full path of the folder
    • hs C:\FileFolder
  • Starting up http-server, serving .
  • Available on:
    • http://10.10.6.2:8080
    • http://127.0.0.1:8080
    • http://youripaddress:8080
  • Hit CTRL-C to stop the server
  • You should be able to browse your file folder contents with any of the above URLs
Hope you are able to access your file contents over the browser

Tip: Using this approach, you can share your content over intranet/internet with full control over data as read only.

After stopped the server, access to the folder is stopped.

Please send your comments and feedback to psrdotcom@gmail.com

February 19, 2020

Nginx Load Balancing Configuration

Hi folks,

I am going to explain the process of load balancing the web application using Nginx

Pre-requisites


  • One machine with Nginx installation
  • Two machines with running the same web application

Test setup

All are Ubuntu server machines

  1. 10.10.1.1 - Load Balancer
  2. 10.10.1.2 - Node 1
  3. 10.10.1.3 - Node 2


Configuration

In the Nginx server machine (10.10.1.1) do the following load balancing configuration


  • Make sure you stop the nginx server if running

$ sudo service nginx stop

  • Edit the nginx.conf file 

$ sudo vi /etc/nginx/nginx.conf

  • Place the following sample content

http {
        upstream testsetup {
        server 10.10.1.2;
        server 10.10.1.3;
}
    server{
        listen 8090;
        server_name testsetup;
        location / {
            proxy_pass http://testsetup;
        }
    }
}

  • Start the Nginx server

$ sudo service nginx start

Load Balancing Test


  1. Access the 10.10.1.1:8090 in the web browser
  2. It will redirect to Node 1 (10.10.1.2)
  3. Refresh/Reload the page, the load balancer redirects to Node 2 (10.10.1.3)

Tip

To differentiate the web server, add a footer with different content (Static IP Address) in your index.html


Please send your comments and feedback to psrdotcom@gmail.com

February 11, 2020

Load balancing with IIS ARR Server Farm

Hi Folks,

I am going explain how can you create a software load balancer with IIS Web Server.
This method is HTTP based load balancing.

Pre-requisites


  1. IIS 7 and above
  2. ARR (Application Request Routing) https://www.iis.net/downloads/microsoft/application-request-routing
  3. Minimum two application servers, preferably running on two different machines

Create ServerFarm


  1. After installing the ARR, you should be able to see "Server Farms" in your IIS Server
  2. Right click on "Server Farms" and select "Create Server Farm"
  3. Give a name to the ServerFarm
  4. You would be navigate to "Add Server" Page
  5. Enter the application server/ip address and click on "Add"
  6. Repeat again to add two or more servers
  7. Check the status of the servers in "Server Address and Status" box
  8. Click on "Ok"

Configure Load Balance


  1. Select the created ServerFarm
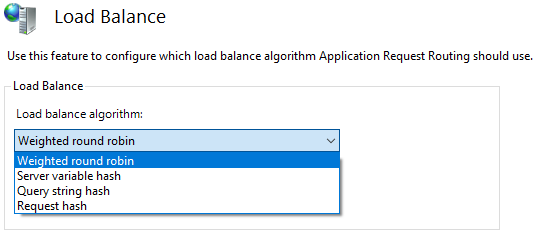
  2. Double click on the "Load Balance" item
  3. Choose the following based on your requirement.
  4. The default configuration as follows
    • Load balance algorithm: Weighted round robin
    • Load distribution: Even distribution


Based on the load balance algorithm, the load distribution options would be changed, if applicable.

Routing Rules Configuration


  1. Select the created ServerFarm
  2. Double click on the "Routing Rules" item

Monitor and Manage the servers

  1. Select the created ServerFarm
  2. Double click on the "Monitor and Management" item

Restart IIS

Once you have completed all the steps, perform the following to make sure everything is in sync.
  1. Open powershell in administrator mode
  2. Run the following commands
    1. net stop was /y
    2. net start w3svc


Please send your feedback and comments to psrdotcom@gmail.com

Deploy or Host ASP.NET Core web application in IIS

Dear folks,

Today I am going to explain the process of deploying the ASP.NET Core web application in IIS (Internet Information Services) web server.

Pre-requsites


Application configuration

To make sure the application deploys and works with IIS, you should add the following while creating the web host.

WebHost.CreateDefaultBuilder(args)
                   .UseKestrel()
                   .UseIISIntegration()
                   .UseStartup();
 Where Kestrel hosts the application and IIS will be acting as a reverse proxy.

Publish the application

After doing the changes, publish the application to a folder as self-contained as you no need to bother about the server for all the application dependencies.

Web Configuration


  • In Web.config, remove the following content
    • hosting="In Progress"
  • Copy files to IIS location
  • Create a website folder in IIS wwwroot folder
  • Copy the publish folder to the website folder
  • Example: C:\inetpub\wwwroot\website

IIS Application Pool


  • Create an application pool in IIS with following configuration
    • Name:
    • .NET CLR version: No Managed Code
    • Managed pipeline mode: Integrated


Website Configuration

  • Right click on the website and select "Add Application"
  • Give the following details
    • Alias:
    • Application Pool: Select above created application pool from list
    • Physical path: Select the above created website path
      • Example: C:\inetpub\wwwroot\website

Restart IIS

  • Once you have completed all the steps, perform the following to make sure everything is in sync.
  • Open powershell in administrator mode
  • Run the following commands
    1. net stop was /y
    2. net start w3svc

Test

Browse to the URL, you should be able to get the web pages.

Please send your valuable feedback and comments to psrdotcom@gmail.com


February 21, 2019

node server address in use error resolution for Windows and Linux machines

Hi friends,

Today, I have come across a situation, where my node server existed unproperly and address has been blocked. Because of which, I am unable to run the node server on the same port.

System configuration

Running my node server on port 3000.

Resolution

Windows Machine

We will first try to find whether the port has been still in listening mode.
netstat -ano | find "LISTENING" | find "3000"
When the above command returns result then take the last number (Process ID)
We will kill the process with the following command.
> taskkill /f /pid

Linux Machine

> netstat -nlp | grep :3000
> kill -9

Now, you will be able to run the node server on the same port which has been blocked.

Please send your comments and feedback to psrdotcom@gmai.com

October 31, 2014

Change IP Address and DNS from static to DHCP and vice versa in Windows Command Line Dynamically using Batch file script

Hi friends,

I was frequently changing my system network from static to dynamic.

I was fed-up with the manual changes by entering the static IP address and changing it to dynamic.

I though of creating a batch file, which requests user to select options and proceed further.


I found something on Internet, just modified it for my purpose and thought of sharing with you all.


  • Check your network name
    • cmd> netsh interface show interface
  • It will list all the network interfaces connected to your system
    • Select the network which you want to change the settings
  • Modify the below code with appropriate network name, IP address, subnet, gateway and DNS server

@echo off

set NETWORK="Local Area Connection"
set IP=10.9.40.95
set SUBNET=255.255.255.0
set GATEWAY=10.9.40.47
set DNSSERVER=192.168.178.1

echo Choose:
echo [S] Set Static IP
echo [D] Set DHCP
echo.

:choice
SET /P C=[S,D]?
for %%? in (S) do if /I "%C%"=="%%?" goto S
for %%? in (D) do if /I "%C%"=="%%?" goto D
goto choice

:S
@echo off
echo "Setting Static IP Address, Subnet Mask and DNS Server"
netsh interface ip set address %NETWORK% static %IP% %SUBNET% %GATEWAY% 1
netsh interface ip set dnsservers %NETWORK% static %DNSSERVER% primary
netsh interface ip show config
pause
goto end

:D
@echo off
echo "Resetting IP Address, Subnet Mask and DNS server For DHCP"
netsh interface ip set address name=%NETWORK% dhcp
netsh interface ip set dns %NETWORK% dhcp
ipconfig /renew

echo "New IP Address, Subnet Mast and DNS Server for %computername%:"
netsh interface ip show config
pause
goto end

:end

Now enjoy the feature of changing IP address with 3 clicks


Please send your feedback and comments to psrdotcom@gmail.com

Blogger Labels: Change,DHCP,vice,Windows,Command,Line,Batch,script,system,user,options,Internet,purpose,Check,interface,interfaces,Select,settings,Modify,gateway,server,NETWORK,Local,Area,Connection,SUBNET,DNSSERVER,Choose,Static,Mask,Mast,feedback,netsh,goto,config

October 08, 2013

OpenVPN Server Windows 7 Installation

Objective

Install OpenVPN Server on Windows 7 machine.
I have followed the tutorial from OpenVPN community. https://community.openvpn.net/openvpn/wiki/Easy_Windows_Guide

Pre-requisites

Disable the Windows Firewall (OR) Enable an Inbound Rule for the port 1194 [2]

Download and Installation

  • Download OpenVPN Server. http://openvpn.net/release/ (Get the latest Version executable based on time)
  • Install the downloaded .exe by running with Administrator privileges
  • Specify the path to a folder which doesn’t have spaces on path.
    • Example:-

      • C:\OpenVPN [Use] [I am installing in this directory and throughout this post, I will be referring this as default OpenVPN installed directory]
      • C:\Program Files (x86) [Don’t use]
  • Navigate to OpenVPN installed directory
  • Go to config folder
  • Create a file with name server.ovpn
  • Paste the content as specified below
  • Go to Network Connections in Windows 7 [Control Panel\Network and Internet\Network Connections]
  • Rename TAP-Win32 Adapter to “MyTap” as described in server.ovpn [Names should match in both server.ovpn and Adapter name]
  •    1: port 1194 #change to any port you see fit. The client needs to use the same port

       2: proto udp #switch to tcp if you wish to use a tcp connection, the client needs to use the same protocol. udp gives better performance

       3: dev tun

       4: dev-node MyTap #name of your TAP interface.

       5: server 10.8.0.0 255.255.255.0 #This may need modification as dictated by Internet Connection Settings. This is the default for ICS on Windows 7.

       6:  

       7: ca "C:\\OpenVPN\\easy-rsa\\keys\\ca.crt"

       8: cert "C:\\OpenVPN\\easy-rsa\\keys\\server.crt"

       9: key "C:\\OpenVPN\\easy-rsa\\keys\\server.key"  # This file should be kept secret

      10: dh "C:\\OpenVPN\\easy-rsa\\keys\\dh1024.pem"

      11: ifconfig-pool-persist ipp.txt

      12:  

      13: push "redirect-gateway def1" #tells all Internet traffic to go through the tunnel

      14: push "dhcp-option DNS 208.67.222.222" #OpenDNS servers, makes it easy to check if the tunnel is working properly

      15: push "dhcp-option DNS 208.67.220.220"

      16: keepalive 10 120

      17: comp-lzo #compression for better network performance. Disable if your server isn't powerful enough. Needs to be included in both server and client configs if you use it.

      18: persist-key

      19: persist-tun

      20: status openvpn-status.log

      21: verb 3


Certificates and Keys Creation

Initial Configuration

  • Open command prompt with Administrator privileges

  • Navigate to OpenVPN directory

  • cd C:\OpenVPN\easy-rsa\

  • run init-config.bat
    • C:\OpenVPN\easy-rsa> init-config

  • Open vars.bat

    • C:\OpenVPN\easy-rsa> notepad vars.bat

  • Change the HOME variable to your path
    • HOME=C:\OpenVPN\easy-rsa

  • Change country, province, City, Org, email

  • You can add KEY_NAME=your-name and KEY_OU=VPNer

  • Run the vars.bat file
    • C:\OpenVPN\easy-rsa> vars

  • Run the clean-all.bat file
    • C:\OpenVPN\easy-rsa> clean-all

Creating Certificates and Keys


Your Own Certificate Authority Generation

  • Open command prompt with Administrator privileges

  • Navigate to OpenVPN directory

  • cd C:\OpenVPN\easy-rsa\

  • run build-ca.bat

    • C:\OpenVPN\easy-rsa> build-ca

    • Accept the defaults and give Common Name as your-company CA

    • Ex:- OpenVPN-CA


Server Certificate and Key Generation

  • Open command prompt with Administrator privileges

  • Navigate to OpenVPN directory

  • cd C:\OpenVPN\easy-rsa\

  • run build-key-server.bat file

    • C:\OpenVPN\easy-rsa> build-key-server server

    • Enter common name as “server” since your command line input parameter is “server”

    • Sign Certificate: accept with ‘y’

    • Commit: accept with ‘y’


Client Certificate and Key Generation

  • Open command prompt with Administrator privileges

  • Navigate to OpenVPN directory

  • cd C:\OpenVPN\easy-rsa\

  • run build-key.bat file

    • C:\OpenVPN\easy-rsa> build-key client-name

    • Ex:- build-key my-laptop

    • Enter common name as “my-laptop” since your command line input parameter is “my-laptop”

 Key Exchange Certificate(Diffie-Hellman)

  • Open command prompt with Administrator privileges

  • Navigate to OpenVPN directory

  • cd C:\OpenVPN\easy-rsa\

  • run build-dh.bat file

    • C:\OpenVPN\easy-rsa> build-dh

Send Server Certificates and Keys to Client


Send the following files to client
  1. ca.crt

  2. client-name.crt

  3. client-name.key

All these files will be stored in C:\OpenVPN\easy-rsa\keys


Common Errors and Resolution

  • openvpn unable to write 'random state'
    • Change the HOME variable path to absolute path in vars.bat file

    • Ex: HOME=C:\OpenVPN\easy-rsa

  • openvpn server directive network/netmask combination is invalid
    • Give IP address as 10.8.0.0 in server.ovpn

  • TapAdapter not found

    • Go to Network Connections in Windows 7 [Control Panel\Network and Internet\Network Connections]
    • Rename TAP-Win32 Adapter to “MyTap” as described in server.ovpn [Names should match in both server.ovpn and Adapter name]


Run OpenVPN GUI

  • Start->All Programs->OpenVPN->OpenVPN GUI

  • It will come to status bar as notification icon [Default: bottom]

  • Rightclick on OpenVPN GUI and click on “Connect”

  • It should display proper log, if any error please search in Google and openvpn forums

References


https://community.openvpn.net/openvpn/wiki/Easy_Windows_Guide

http://blog.defron.org/2013/01/openvpn-server-on-windows.html

Please send your feedback and comments to psrdotcom@gmail.com

Blogger Labels: OpenVPN,Server,Installation,Objective,Install,machine,tutorial,Easy_Windows_Guide,requisites,Disable,Firewall,Enable,Inbound,Rule,port,Download,Version,Administrator,privileges,Specify,path,folder,spaces,Example,directory,Program,Files,Navigate,Create,Paste,Network,Connections,Control,Panel,Internet,Rename,Adapter,MyTap,client,needs,connection,protocol,performance,node,interface,modification,gateway,traffic,option,OpenDNS,compression,status,Creation,Initial,Configuration,Open,notepad,Change,HOME,province,KEY_NAME,KEY_OU,VPNer,Certificate,Generation,Accept,Common,Name,Enter,parameter,Sign,Commit,laptop,Exchange,Diffie,Hellman,Send,Resolution,directive,combination,Give,TapAdapter,Start,notification,icon,Default,bottom,Rightclick,Connect,error,Google,Certificates,Errors,forums,References,wiki,config,ovpn,dhcp,init,vars

June 18, 2013

Unable to Share folders in Ubuntu problem got resolved (Samba)

Hi friends,

I was not able to share my folders within network sometime back.

After searching and modifying configuration file my problem got resolved.

Problem

Unable to share Ubuntu folders

Message:  

net usershare' returned error 255: net usershare add: cannot share path /opt/foldingathome as we are restricted to only sharing directories we own.
Ask the administrator to add the line "usershare owner only = False"
to the [global] section of the smb.conf to allow this.

Resolution:

  1. Type the following in console
    • $ sudo vi /etc/samba/smb.conf
  2. Go to [global] section
  3. Add the following line
    • usershare owner only = False
  4. Save and exit from vi
  5. Restart Samba service
    • sudo service samba restart
Now, you can happily share your folders over network

Please send your feedback and comments to psrdotcom@gmail.com
 

Featured Post

Java Introdcution

Please send your review and feedback to psrdotcom@gmail.com