Showing posts with label Data. Show all posts

October 06, 2020

Convert JSON file to CSV with Python

 Hi folks,

Today I will explain the code to implement the Json2CSV conversion.

Make sure you have valid JSON file with an array of objects.

Sample:

"Users":[

{"id": 1, "Name": "Suresh Raju", "Age": 35},

{"id":2, "Name": "PSR", "Age": 34}

]

I have chosen Python language to convert because of inbuilt library support for json and csv and command line execution with Notepad++ as editor.

Source Code Snippet: GitHub Gist

Please send your valuable feedback and comments to psrdotcom@gmail.com


April 21, 2020

Send email from Microsoft excel with customized sheet data

Hi folks,

Have you ever faced requirement where you have to send email from an excel with excel data. If you are in that situation, this blog makes your life easier.

Pre-requisites
Send customized excel data of each row as an email. You should have data in each row and you should know have recipient e-mail address
You should have configured e-mail client like outlook, mail of desktop

Procedure
  1. Use Hyperlink function of excel
    • Syntax
      • =HYPERLINK("mailto:"&e-mailCellNo&"?subject="&subjectCellNo&"&body="&bodyCellNo&"%0A","Send email")
    • Help
      • Cellno in syntax should point to your data cell number
      • %0A - New line
      • mailto - The recipient mail address
      • subject - the text
      • body - the body text
    • Note
      • If you have any special characters, then use ENCODEURL function
      • Don't put the ENCODEURL function in HYPERLINK function
      • Make sure, ENCODEURL output points to a different cell and use that cell number in HYPERLINK
  2. Use $ to use the same cell data repeatedly
  3. After doing the hyperlink to a cell, you should be able to view "Send email"
  4. Click on the send email
  5. Opens the configured/default e-mail client by filling the recipient, subject and body content from excel sheet
  6. Click on "send" or "Ctrl+Enter" keyboard shortcut to send email
Hope, this helps you to explore excel and send email with excel data to many recipients with single click

Please send your valuable feedback and comments to psrdotcom@gmail.com

July 29, 2019

Docker postgres db to local volume/drive for persistent storage permanently

Hi all,

Today, I would be explaining the way to maintain the DB with data persistent when connecting to docker.

System Status

Postgresql DB container is in Docker
Windows 10 PC
Linux containers

Issue

Whenever I restart docker/PC the database wiped off due to container is stopped.

Solution

Create a docker volume

Syntax: docker volume create <>
Example: docker volume create pgdata

Start the container with volume option

Syntax: docker run --rm --name <> -e POSTGRES_PASSWORD=<> -d -p 5432:5432 -v <>:/var/lib/postgresql/data <>
Example: docker run --rm --name pgcontainer -e POSTGRES_PASSWORD=MyPassword -d -p 5432:5432 -v pgdata:/var/lib/postgresql/data postgres

Now, you can run all your database commands

Upon restart also, your data should be safe.

Thanks for reading the blog post.

Please send your feedback and comments to psrdotcom@gmail.com

November 26, 2018

Oracle Create User with custom tablespace and datafile

Hi all,

Through I have explained the procedure to delete/drop the user with tablespace and datafiles. I though of giving information about creating a user with custom tablespace and datafile.

Pre-requisites


  1. Oracle database
  2. Login as sys as sysdba

Procedure

Create tablespace

Syntax: CREATE TABLESPACE DATAFILE SIZE ;
Example: CREATE TABLESPACE sample_tablespace DATAFILE 'C:\\samplets.dbf' SIZE 100M;
Example: CREATE TABLESPACE sample_tablespace DATAFILE '\usr\local\datafiles\samplets.dbf' SIZE 100M;

User creation

Alter session
ALTER SESSION SET "_ORACLE_SCRIPT"=true;

Create User
Syntax: CREATE USER IDENTIFIED BY DEFAULT TABLESPACE ;
Example: CREATE USER sampleuser IDENTIFIED BY samplepwd DEFAULT TABLESPACE sample_tablespace;

Grant privilieges
Syntax: GRANT ALL PRIVILEGES to ;
Example: GRANT ALL PRIVILEGES to sampleuser;

Commit the commands
commit;

Now, you should be able to create the tablespace and made that as default tablespace for the newly created user.

Hope, this information helps you.

Please send your comments and feedback to psrdotcom@gmail.com

Oracle Drop/Delete User with All tables and files

Hi All,

Today I am going to explain the procedure to delete/drop a user in Oracle database along with tables and mapped files for that user tablespace.

Pre-requisites

Oracle database with the following

  1. User
  2. Tablespace of the user
  3. Datafile of the tablespace

Procedure

Drop the user

Syntax: DROP USER CASCADE;
Example: DROP USER sampleuser CASCADE;

Make the tablespace offline

Syntax: ALTER TABLESPACE OFFLINE;
Example: ALTER TABLESPACE sampletablespace OFFLINE;

Drop the tablespace with mapped datafile[s]

Syntax: DROP TABLESPACE INCLUDING CONTENTS AND DATAFILES
Example: DROP TABLESPACE sampletablespace INCLUDING CONTENTS AND DATAFILES

With the above 3 commands, you can make sure that, user and user related data has been completed removed from database.

Hope, it will help to resolve your issue.

Please send your feedback and comments to psrdotcom@gmail.com

February 06, 2016

Microsoft Excel Select a value from a predefined list of values with dropdown option to validate the data

Hi friends,

When I was preparing a sheet by referencing some pre-defined names as list to a field/cell. I was thinking the feature of Microsoft Excel dropdown list. After exploring the option and using, I thought of sharing with you all.

Objective: Selecting a cell value from a list of pre-defined values

Procedure:
  1. Open blank excel workbook
  2. Prepare you template with headers
  3. Create a new sheet and rename it. Ex: "Names"
  4. Enter the values from Column A from cell A1 in vertical direction
  5. Don't use any other columns
  6. Don't leave any empty cell in between the values
  7. Leave first cell as empty, if you want to include the empty option in a dropdown
  8. Select the cell which contains the values
  9. Right click and choose the option "Define Name"
  10. Give a name to the list of values. Ex: NamesList
  11. Click on "OK" button
  12. Now, move to the sheet where we want to use the list of names as a dropdown option
  13. Select the cell(s), where we want to have the dropdown list
  14. Click on "Data" Menu
  15. From "Data Tools" ribbon, click "Data Validation" from "Data Validation" submenu
  16. In Settings tab, Validation Criteria section, for the option Allow, select "List"
  17. Choose the options
    • Ignore blank: Ignore when user no selected any option
    • In-cell Dropdown: Show the dropdown list in cell
  18. In "Source" field, type the defined name for the list preceded with = (Equal to) symbol. Ex: =NamesList
  19. Now, you should be able to see the dropdown with empty values
  20. Select the predefined values from the dropdown list of names.
Please send your comments and feedback to psrdotcom@gmail.com

    August 22, 2015

    UDPCast, udp sender and udp receiver Sharing files over LAN/Wi-Fi

    Hi admins,

    Have you ever thought of sending files/folders to all your systems which are connected over LAN?
    Have you ever thought of copying the entire partitions including OS to all your systems with same configuration which are connected over LAN in your lab?

    You might be using some proprietary tools.

    Let me share my knowledge of open source tools in Ubuntu to perform the job.

    It is UDP Case with following operations
    1. udp-sender
    2. udp-receiver

    Simple usage can be seen in References 2

    References

    https://www.udpcast.linux.lu/cmd.html
    https://www.udpcast.linux.lu/cmdlinedoc.html

    Please send your comments and feedback to psrdotcom@gmail.com

    May 12, 2015

    Bulk import of csv, text file data into MS SQLServer 2012

    Hi friends,

    Today we have done bulk import of data using csv/txt format into MS SQLServer 2012.

    Procedure

    1. Right click on your database and select “Tasks -> Import Data”
    2. Click the “Next>” button
    3. For the Data Source, select “Flat File Source”.
    4. Browse and select the CSV/TXT file
    5. For the Destination, select the correct database provider (e.g. for SQL Server 2012, you can use SQL Server Native Client 11.0).  Enter the Server name; check Use SQL Server Authentication, enter the User name, Password, and Database before clicking on the Next > button. 
    6. Change the options like delimiter, carriage return(new line), First row as header
    7. Spend some time configuring how you want the data to be imported before clicking on the Next > button.
    8. Change the table name
    9. Change the columns datatype
    10. Preview your table
    11. On the Select Source Tables and Views window, you can Edit Mappings before clicking on the Next > button
    12. Check Run immediately and click on the Next > button. 
    13. Click on the "Finish" button to run the package
    14. You data with the table will be selected
    Enjoy the simple and useful bulk data import.

    Please send your feedback and comments to psrdotcom@gmail.com

    Blogger Labels: Bulk,text,data,SQLServer,Procedure,database,Tasks,Import,Click,Source,Flat,File,Browse,Change,options,carriage,header,Spend,columns,Preview,Finish,Enjoy

    October 16, 2014

    Convert windows drive or disk file system from FAT32 to NTFS without losing data

    Hi all,

    I had a problem with my external hard disk when copying some 25GB file.

    I had troubleshoot the problem and understand that, my hard disk file system is FAT32, which can only copy max 4GB single file size


    I was thinking without losing my data, how can I change the file system, so that, I copy more than 4GB sized single files

    Then I come across the following commands in Windows

    1) chkdsk : Check disk

    2) convert : Convert disk file system


    chkdsk command

    Syntax

    cmd> chkdsk volume_letter: [options]

    Example

    Checks for disk errors and fix it

    cmd> chkdsk I: /f


    convert command

    Syntax

    cmd> convert volume_letter: FS:NTFS [options]

    Example

    Convert volume from FAT to NTFS in verbose

    cmd> convert I: /FS:NTFS /V


    Possible Errors with solutions

    Insufficient Memory

    Reason

    Nearly 4 GB files in existing FAT32 system

    Solution

    Move the files to local drive, do chkdsk and then convert


    References:

    http://ss64.com/nt/chkdsk.html

    http://www.computerhope.com/convert.htm


    Blogger Labels: Convert,disk,system,NTFS,data,size,Windows,Check,Syntax,options,Example,Checks,errors,Possible,solutions,Insufficient,Memory,Reason,Solution,Move,References,chkdsk,volume_letter

    January 14, 2014

    Sony Xperia L Jellybean 4.2.2 Update Speaker Volume and Mobile Internet Data Connectivity Problem and Solutions

    Hi all,

    I have updated my sister’s phone from Jellybean 4.1.2 to Jellybean 4.2.2.

    She found two problems,

    Problems

    1) Internet Mobile Data is not working

    2) Speaker Volume is very low

    Solutions

    1) Install “Internet Settings” from Settings->Xperia option. It will installs and activates your mobile data

    2) After update manually Switch off and Switch On the device


    Simple but vital solutions for any Sony customer


    Please feel free to send your comments and feedbacks to psrdotcom@gmail.com

    Blogger Labels: Sony,Xperia,Jellybean,Update,Speaker,Volume,Mobile,Internet,Data,Problem,problems,Install,option,Switch off,Switch On,Simple,customer,comments,Solutions

    November 22, 2012

    Mount TrueCrypt Volume with Read and Write File Permission for Users and Groups

    Hi friends,

    I have been working on Ubuntu from a long time. Recently I am exploring on TrueCrypt and I faced the following issue. After searching lot of websites and forums, I made a solution which worked for me perfectly.

    Objective:
    TrueCrypt volume copied data should be available to all when its mounted.

    Usual Procedure:
    Mount the TrueCrypt volume in Ubuntu
    Copy some data to the volume
    Change file permissions to other users or groups
    Other users should be able to view the data from the volume when mounted

    Hiccup(Problem):
    After mounting the TrueCrypt Volume the directory permissions are changed and fixed to 700 (rwx --- ---). i.e. No access to groups and others.
    Changing the directory permissions and changing the ownership will not be applied.
    So, other groups and others cannot access the data.

    Solution:
    While mouting the TrueCrypt volume we need to specify the file system type and give permission to user[s] and/or group[s] with umask.

    Please find the syntax and example below

    Syntax:
    $sudo /usr/bin/truecrypt -t --filesystem={filesystem_type} --fs-options={rwx},uid={userid},gid={groupid},umask={ugorwx} {your_tc_volume} {mounting_folder}

    Example:
    $sudo /usr/bin/truecrypt -t --filesystem=vfat --fs-options=rw,uid=1000,gid=1000,umask=022 tc1.tc /mnt/folder1

    Thanks for visiting my blog.

    Please send your feedback and comments to psrdotcom@gmail.com

    March 21, 2012

    Excel Macro to Split Cell Data with Delimiter and Copy in other Columns

    Hi all,
    Today I have written one more small macro in Excel to split the data with the delimiter and copy to the columns which are beside to the data.


    Sub splitdata()

    Dim data As String
    Dim values As Variant
    Dim i As Long

        Set DataRange = Range("A1").CurrentRegion
        Range("A1").Select
        For Each cell In Range("A1").CurrentRegion
           
            'Getting text from the cell
            data = cell.Text
           
            'MsgBox ("Data :" & data)
           
            'Gettings Values
            values = split(data, ",")
           
            For i = 0 To UBound(values)
                'MsgBox ("Value is: " & values(i))
                'Splitting to other columns
                cell.Offset(0, i + 1).Value = values(i)

            Next i

        Next cell  
     

    'Autofit the content to the column
        Cells.EntireColumn.AutoFit
       
    End Sub


    Please send your feedback and comments to psrdotcom@gmail.com

    February 28, 2012

    Simple Steganography to hide file(s) under an image in Windows

    Hi all,

    Do you want to hide your files under an image to secure important data? That is called Steganography.

    In Windows with "copy" command, it is possible.

    Pre-Requisites:
    An image file with any image file extension .jpg, .png etc
    A File to hide in any format
    An archive file manager like WinRAR, 7-Zip etc.


    Procedure:

    We will be explaining with sample example and the following files will be used in the explanation.

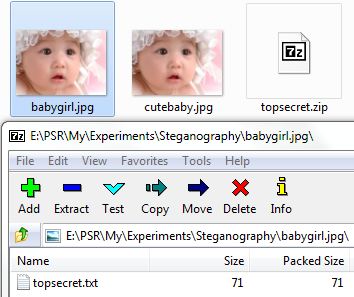
    cutebaby.jpg -> Cover Image, which hides the data file
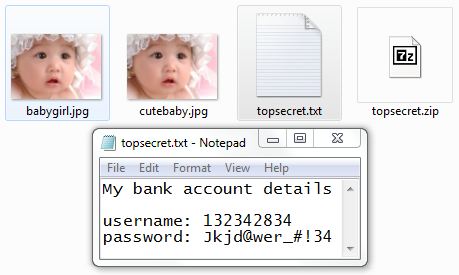
    topsecret.txt -> file to be hidden
    babygirl.jpg -> stego image, which contains hidden data file
    E:\PSR\My\Experiments\Steganography -> Working Folder


    • After arranging the pre-requisites as above shown, archive your data file (file to hide). In this example, it is "topscret.txt"


    • Now you will be getting the archive file named "topscret.zip" in the file explorer
    • Open Command Prompt and Navigate to the corresponding folder. In this example
    • Delete the "topscret.txt" by using the "del" commad
    • Now, run the copy command with the following syntax 
      • Syntax: copy /b +  
      • Example: copy /b cutebaby.jpg + topsecret.txt babygirl.jpg
    • It will create an image file which contains hidden data file in it.
    • To view the stored data file from the image, open the image file from archive viewer.
    • Specify the path to extract
    • Click on "Extract" button
    • View the file list from Windows explorer and/or command prompt
    • Check the data file content
    Note:
    • The stego image file size would be more than the data file + cover image file size
    • Any one can view the data file if they know that data file is hidden under the cover image
     
    If you have any queries, send mail to psrdotcom@gmail.com

    September 09, 2010

    Excel VBA: Multi-selection Listbox using pop-up window to display column values

    Description:

    We have following excel sheet with the two columns Names and Requirednames.
    Names column has all the names
    Required Names column should have some selected name(s)

    Names Required Names
    ABC,DEF,GHI  
       
    PSR,DOT,COM  


    What we can do other than copy and paste?

    We can create a pop-up window which will display all the names by using list box and we can select the required names from that list box.

    Procedure:
    1.Go to Developer Tab -> Design Mode
    2.Click on Insert and click -> CommandButton
    3.Drag the cursor to create a button
    4.Rename button with name "Show Names" in sheet
    5.Assign a macro to it with name "DisplayNames"
    6.Open VBEditor
    7.Goto Insert -> User Form
    8.We will get one form, Design the form as follows
    9.
    UserForm1


    10.Change Caption to "Names Selection" in Form Properties
    11.Change Caption to "List of Names" in Frame Properties
    12.Change Caption to "Select the names and click OK" in Lable Properties
    13.Change Name to "lbEmp", MultiSelect to 1-fmMultiSelectMulti in ListBox Properties
    14.Change Name to "submit" and Caption to "OK" in Button1 Properties
    15.Change Name to "close" and Caption to "Close" in Button2 Properties
    16.Change Name to "reset" and Caption to "Reset" in Button3 Properties
    17.Select Excel window, Go to Macros and Select "DisplayNames" macro(which is already assigned to the Button in Sheet), Click on Edit
    18.Write the following code:
    Dim rngEmp() As String
    Dim emps As String
    Dim i As Integer

    Application.Sheets("Sheet1").Select
    emps = ActiveCell.Offset(0, -1).Value
    If emps = "" Then
    MsgBox ("No Name(s) Available")
    End
    Else
    rngEmp = Split(emps, ",")
    End If

    For i = LBound(rngEmp) To UBound(rngEmp)
    UserForm1.lbEmp.AddItem rngEmp(i)
    Next

    UserForm1.Show
    19.
    Double-click on the UserForm1 from the Forms directory in VBEditor
    20.
    Double-click on any one of the button on the form to view code(shortcut: F7)
    21.
    Select all the code and delete it. Paste the following code

    Private Sub close_Click()
    Unload UserForm1
    End Sub
    Private Sub reset_Click()
    UserForm1.lbEmp.Clear
    End Sub
    Private Sub submit_Click()
    Dim emps As String
    emps = ""
    For i = 0 To UserForm1.lbEmp.ListCount - 1
    If lbEmp.Selected(i) = True Then
    'MsgBox lbEmp.List(i)
    If emps = "" Then
    emps = lbEmp.List(i)
    ElseIf emps <> "" Then
    emps = emps & "," & lbEmp.List(i)
    End If
    End If
    Next i
    ActiveCell.Value = emps
    End Sub
    21.Save and Close the VBEditor. Goto Excel sheet
    22.Select the right adjacent Cell say B1 Cell
    23.Click the button which we created on the sheet
    24.Select the name(s) and Click Ok to see values in the selected cell
    25.We can select Multiple Names at a time which will display names with the delimiter "," in the selected cell
    26.If A's cell doesn't contain any value then it will display a message "No Name(s) Available"
    27.We have to select Close to close the pop-up window
    28.We can select Clear to clear list and then select close to cancel

    You can see the sample output

    Names Required Names
    ABC,DEF,GHI ABC
       
    PSR,DOT,COM PSR,COM

    Note:
    For any further queries and/or suggestions please contact psrdotcom@gmail.com

    August 31, 2010

    Searching and auto filing using macros in excel with in sheets

    Description:

    Sheet1 contains Employee details as follows
    (Employee Name, Project, Skills, Role, Start Date, End Date)

    Sheet2 contains the new modules/projects which need some more man power with these details
    (Project, Skills, Role, Start Date, No. of Persons Required, No. of Persons available, Gap, Names Available)

    Here is the Sheet1 in excel

    Employee name
    Project
    Skills
    Role
    Start Date
    End Date
    Abc
    P1
    S1
    R1
    2-Feb-10
    15-Oct-10
    Def
    P2
    S2
    R2
    15-Mar-10
    20-Sep-10
    Ghi
    P3
    S2
    R3


    Jkl
    P4
    S1
    R4
    15-Jan-09
    20-Dec-09
    Mno
    P3
    S1
    R1
    15-Mar-10
    15-Mar-12
    PSR
    P6
    S2
    R2
    15-Mar-10
    12-Dec-10
       

    Sheet2 contains as follows

    Project Name Skills Role Start Date No. Of Persons Required No. Of Persons Exist Gap Names Available
    P5 S1 R2 16-Oct-10 5 3 2  
    P1 S2 R1 2-Feb-10 6 6 0  
    P6 S1 R1 1-Jan-11 2 1 1  
    P3 S2 R2 15-Mar-10 4 3 1  
    P7 S2 R3 21-Aug-10 5 3 2  
    P6 S2 R2 1-Jan-11 7 3 4  

    Now, we can write a macro which will fill the names available column with the specified skills and roles

    Macro Code:


    'Macro Code Starts Here

    Sub Find_Gap()
        Dim names As String
        Dim startDate As Date
        Dim skillsVal As String
        Dim roleVal As String
       
        Dim currentCell As Range
       
        'Searching or Finding Value should be in Sheet2
        Sheets("Sheet2").Activate
       
        'Gap column should be in 'G' Column
        Set currentCell = Range("G2")
        currentCell.Select
        names = ""
        'MsgBox (currentCell)
       
        Do
            names = ""
            gapVal = ActiveCell.Value
        If gapVal > 0 Then
            'MsgBox (gapVal)
            'startdate column should be in 'D' Column i.e D-G=-3
            startDate = ActiveCell.Offset(0, -3).Value
           
            'Role column should be in 'C' Column i.e D-G=-4
            roleVal = ActiveCell.Offset(0, -4).Value
           
            'Skills column should be in 'B' Column i.e C-G=-5
            skillsVal = ActiveCell.Offset(0, -5).Value
           
            'MsgBox (startDate & skillsVal & roleVal)
            names = SearchPeople(startDate, skillsVal, roleVal)
        End If
        Sheets("Sheet2").Activate
        'MsgBox (names)
        If names <> "" Then
            currentCell.Offset(0, 1).Value = names
        Else
            currentCell.Offset(0, 1).Value = "-NA-"
        End If
       
        'Name Available Column should be next to Gap 'G' Column
        Set currentCell = currentCell.Offset(1, 0)
       
        currentCell.Select
       
        'Gap column Should be in 'G' Column
        Loop Until IsEmpty(ActiveCell.Offset(0, -6).Value)
       
    End Sub


    Function SearchPeople(startDate As Date, skillsVal As String, roleVal As String) As String
           
        'Employee Details should be in Sheet1
        Sheets("sheet1").Activate
       
        Dim names As String
        names = ""
       
        'Employee Name should be in 'A' Column
        Range("A2").Select
       
        Do
        'StartDate should be in 'E' Column and EndDate Should be in 'F' Column
            If ActiveCell.Offset(0, 4).Value <> Null Or ActiveCell.Offset(0, 5).Value < startDate Then
                'Skills column should be in 'C' Column and Roles in 'D' Column
                If ActiveCell.Offset(0, 2).Value = skillsVal And ActiveCell.Offset(0, 3).Value = roleVal Then
                    If names <> "" Then
                        names = names & "," & ActiveCell.Value
                    Else
                        names = ActiveCell.Value
                    End If
                End If
            End If
            'MsgBox (names)
           
            ActiveCell.Offset(1, 0).Select
        Loop Until IsEmpty(ActiveCell.Value)
        SearchPeople = names
    End Function

    'Macro Code Ends Here


    When you run the macro, the Names Available column will be filled as follows
    Project Name Skills Role Start Date No. Of Persons Required No. Of Persons Exist Gap Names Available
    P5 S1 R2 16-Oct-10 5 3 2 -NA-
    P1 S2 R1 2-Feb-10 6 6 0 -NA-
    P6 S1 R1 1-Jan-11 2 1 1 Abc
    P3 S2 R2 15-Mar-10 4 3 1 -NA-
    P7 S2 R3 21-Aug-10 5 3 2 Ghi
    P6 S2 R2 1-Jan-11 7 3 4 Def,PSR

    You can edit the macro according to your requirements.

    Featured Post

    Java Introdcution

    Please send your review and feedback to psrdotcom@gmail.com